Case of the Missing Coat: A Christmas Crime Scene PBL for Forensics
What Happens When Santa Realizes His Magic Coat Was Stolen From His Closet? …… He calls 911 and deploys E.L.F.S. (Evidence Locating Forensic Squad)
This time of the year is just wonderful hectic! My students are tired and stressed. I am tired and stressed. Sometimes, this just isn’t a good combination for getting all the things covered that we need to before the holiday breaks. This year, I decided to try something a little different.
This summer, I participated in the Educator’s Symposium, an awesome professional development program presented by Sirchie. It was via Zoom but we had tons of opportunities for interaction. They even delivered the investigative supplies I would be using right to my house!
The sessions were led by professionals in the field of Forensics. I particularly enjoyed the presenter for Trace Evidence. He had worked on many high profile cases with the FBI, many of which we actually study in my classroom. I realized that I wasn’t providing enough opportunities for my students to experience collecting and investigating evidence that was super tiny. In a “normal” year, I don’t ever have enough time to cover Trace Evidence as well as I’d like so I decided to mix things up!
So What Did We Do?
Because I feel like Trace Evidence (hair & fibers) and Impressions (footprints, lip prints, & bitemarks) are some of my weakest areas to teach, I wanted to challenge myself this year to expose my students to more performance-based lab activities instead of the traditional notes and basic “testing labs” that I have done in the past. If you’ve been a follower of this blog for long, you know how much I absolutely LOVE providing my classes with project-based (or problem-based) learning (PBL) scenarios! I think they are one of the BEST ways I can engage all of my students, even the ones who are traditionally uninterested in class (don’t we all have those folks?!?). So, I just knew this would be the avenue I wanted to use for Trace Evidence and Impressions. And, since it’s almost the holidays… I HAD to include Santa! (Plus, Dollar Tree has AMAZING things that I can use in a crime scene…. almost as good as the things they have for Halloween!) I’ll put a list of the items I used for this activity at the end so you can hit up the Dollar Tree for your Forensics activities. It’s my favorite place for supplies!
The Crime Scene…..
911: Hello, this is 911. What is the address of your emergency?
Santa: This is Santa! I live at the North Pole and I just went into my closet and my suit is GONE! How can we have Christmas if I have no magic coat?
911: Sir, calm down. We are sending someone out.
Santa: Don’t just send someone…. Deploy E.L.F.S!
In case you didn’t know, E.L.F.S. stands for Evidence Locating Forensic Squad 🙂 (or it does for my class lol). I set the stage for this activity by having Christmas music playing today as they came in for class (we also played it on my little bluetooth speaker in the lab as we worked). I arranged my room into groups of 4 or 5 so they just had to sit with the group they chose as their team. Their lab/ activity instructions, forms, and notes were on clipboards in each pod. (Side note: I figured this out after 25 years and it has been a game changer for managing groups in my classroom. It saves tons of time and takes the guesswork out of who is going to work with whom. Works like a charm with my Seniors. I also put their materials on clipboards for them to use. It makes being mobile in the lab or outside at a crime scene super easy and keeps everything together. Plus, they feel so official!)
Notes on different topics are different colors!Clipboards make you feel official 🙂
When everyone had assembled themselves into their teams, I played a short 45 second clip from the film “The Santa Claus” where they deploy E.L.F.S. and introduced their “mission”. I have found, from doing this so long, that if I cover the basics of the activity in the classroom (in a controlled setting), I tend to have more success with students who know what they’re doing and how they’re doing it when we get into the lab. Even though I teach Juniors and Seniors in high school, they still lose their marbles when we go into the lab and forget how to act. It’s crazy how that happens! Anyway, I brief them on their mission and have the jobs, job descriptions, and responsibilities written very plainly in a chart on the front of their lab work. Also, I always have a chart showing the specific responsibilities if their group has fewer (or more) group members than I specified. I do, however, usually cap it at 5 or 6 members. Today, I gave them 5 minutes (I set a timer too!) to decide on which job each member wanted to do, elect a Lead Forensic Investigator to be the spokesperson for the group, and come up with a team name.
The Lab Stations
This PBL covered a TON of Forensic Science standards and objectives! Some standards were related to the basic concepts of Trace Evidence and Impressions, others related to process standards such as:
Observation
Comparison of unknown to a known standard
Collecting and processing evidence
Preservation of evidence
Chain of custody
Crime scene sketching
Triangulation of evidence
Visualizing evidence using an alternate light source
Performing flame tests to distinguish between types of fibers
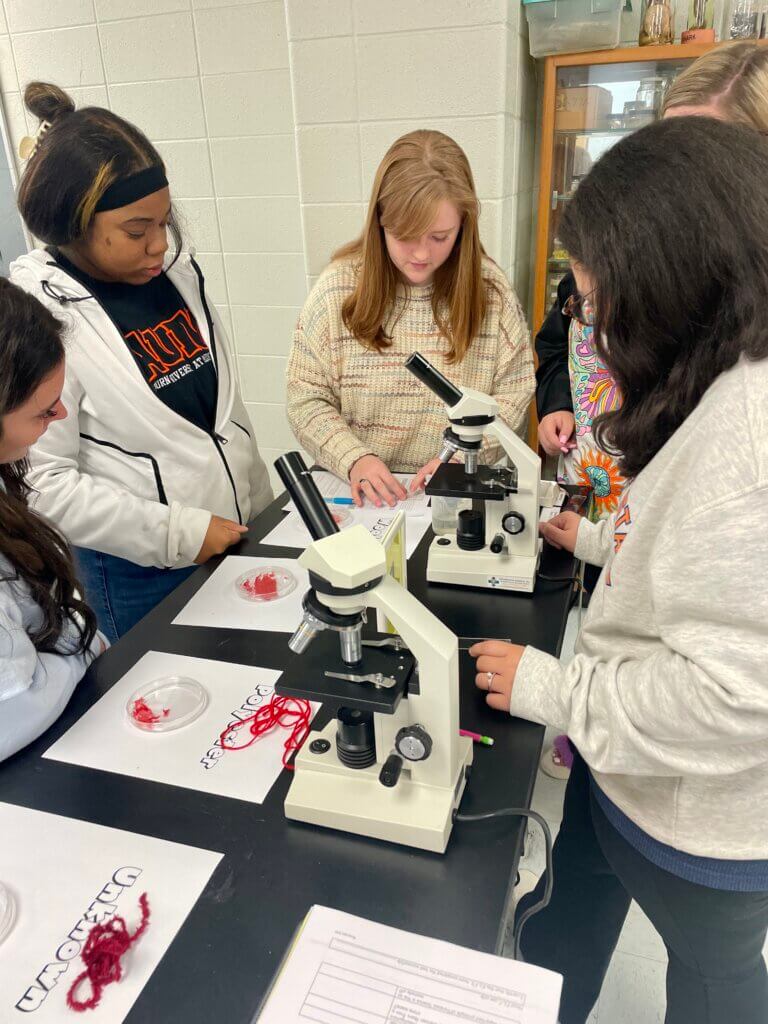
Microscopy
Creation of a wet mount slide
The Set Up
Because there is SO much packed into this experience for my students, I decided this time to set up the crime scene in our prep room located between our Biology and Chemistry labs. It was a great controlled space that wasn’t overly large. We also used the storage closet (with the door propped open) as a dark area for visualizing trace evidence using a black light and an alternate light source (ALS) {*In case you don’t know what ALS is- It’s a blue flashlight with an orange filter that makes easily missed trace evidence really pop so it can be collected. It works best in dim light.}
I also designed this activity as a series of 6 stations that could be completed in any order. I’m so glad I did because they only got 3 of the 6 stations completed today in a 90 minute block. I wasn’t really sure how long it would take them, and which stations might require longer, so I’m pleased that they all took about the same amount of time to complete. Next class, they will complete the other 3 stations before they move into the next phase of the PBL. (Preview: The 2nd phase will involve a CER of their theory of the crime based on the evidence they collected and tested. The 3rd phase will involve a STEM component and will count as their midterm.) The stations I used involved stations for observations, creating a wet mount slide of a fiber type, matching lip prints and bitemarks, flame testing, performance tasks (like creating a bindle and packaging evidence), crime scene processing and sketching, and collection of trace evidence. Here are some pictures of the way I set it up:
Lab set up from the front of the room. Traffic cones are evidence markers (Dollar Tree!). The large plastic bags at the front are the evidence (a Christmas stocking) they have to process and collect trace evidence from (lots of glitter, fake fur, fingerprints in Glo Germ powder).
The evidence in those plastic bags.
Processing their evidence for trace with an alternate light source (& a black light). I set up an “annex” in the supply closet so it would be dark enough to see their trace. evidence.
Fiber testing station. I tried to get all the same color so they wouldn’t get sidetracked by a sample just because of its color. (Yarn samples from Dollar Tree, cotton fat quarter fabric from Walmart, wool from Hobby Lobby).
Set up for the Fiber Observation Station. Student teams had to perform observations then make a wet mount slide of one sample. Groups all did different samples. I asked them to leave their slide under the microscope and in focus so the groups could see all the samples (without having to make ALL the slides). I had to spread out the microscopes because we only have 2 outlets at each lab bench.
Flame tests of our fibers
The door to Santa’s closet (& the entrance to the crime scene). Dollar Tree sign for the win!
The basic crime scene set up. Glad I didn’t put my black lights up from Halloween lol! Big candy canes, tinsel, Santa hats, Christmas glasses and plate all from Dollar Tree 🙂
I actually put a Christmas brownie with a bite taken out of it on this plate. I love how the fingerprints really show up with the black light! I used some Glo Germ powder I found in my closet. It worked great! The green Grinch fur also looked cool with the black light.
Dollar Tree has literally the cutest Christmas plates and glasses. The glasses say Mr. & Mrs. with little Santa hats. I really can’t wait to see what sort of theory for this crime that my students come up with!
Lip prints to match from the lipstick print on the glass at the crime scene. I also laminated these on unruled index cards. It worked a lot better than I expected! You could still see the details of the print and no worries about smudging the lipstick print.
Bitemark analysis to see if they can match the bite taken out of the brownie to a dental impression (in a foam plate). I got the smallest size foam plates and put them into sandwich baggies so there wouldn’t be a risk that anyone would touch someone else’s saliva on the plate (yuck!) 🙂 I liked that students could handle the plates, look at them closely through the bag, and also measure them easily if they needed to.
Fur for one of the stations. I laminated it with my little Scotch laminator. I think it really makes the fur/fibers pop!…. Plus, it’s easy for students to handle and observe closely. This brown & black fur was taken from the top of a Dollar Tree stocking. I think it looks like reindeer fur don’t you? 🙂 Green (Grinch) fur was from a stocking from Hobby Lobby I found on sale.
Footprints for the crime scene. I used spray adhesive and sprinkled a little fake glitter snow on the green Grinchy ones. These were fun with the black light.
Sparkly snowy Grinchy feet! I can’t wait to see what my students come up with as an explanation for this struggle lol
What’s Next?
Phase 2
Student teams will complete their final three stations during our next class meeting. Then, after our Thanksgiving break, I will start them on Phase 2 of this PBL, the development of their theory of the crime.
I generally have them state their theory of the crime in CER (Claim, Evidence, Reasoning) format:
Claim– (WHO?)–> Their theory of the crime; who did it?
Evidence– (WHAT?) –> They will provide a specified number of pieces of evidence that support their theory of who committed the crime
Reasoning– (WHY?) –> For each piece of evidence, they will state exactly why the evidence proves their suspect is guilty of the crime.
Phase 3
I anticipate Phase 3 of this PBL to involve a STEM component where they propose a design. I also think that it will count in place of their midterm exam because it will involve a lot of work. I am in the process of writing this part as we won’t be starting it until around December 1st. 🙂
Cool Crime Scene Supplies from Dollar Tree
I promised a list of things I used for this crime scene so you could use it with your students. Most of my supplies always come from Dollar Tree. I do get some things from Walmart and Hobby Lobby if I can’t find them at DT. For this crime scene, I bought these things:
Santa hats and stockings (I used the traditional red ones for trace evidence for each group and one with fake fur at the top as my “reindeer fur”. The green Grinch stocking came from Hobby Lobby on sale).
Sign for closet (I made the closet sign, colored it with marker because I was out of colored ink in my printer, laminated it, and taped it over the original text; Grinch sign was from Hobby Lobby on sale).
Big candy canes, jingle bells, & tinsel (DT)
Little traffic cones (DT- 3 in a pack in the toy section)- loved these for evidence markers!
Fake snow and glitter for footprints and trace evidence on stockings (DT)
Fiber samples (yarn from DT, cotton material from Walmart, & wool from Hobby Lobby)
Footprints (boots, Grinch feet, elf, and hoof prints) I drew & copied on colored paper
Black lights ($10 at Walmart)
Alternate light source (blue light with orange filter) I got from the Sirchie pd
Christmas plate and Santa glasses (DT)
I stole borrowed the crucible tongs and metal rack from our Chemistry lab 🙂
I also made a bunch of cute labels and laminated them so I could re-use them
For this and other PBLs I use with my classes, please follow me on TpT
Don’t forget to visit my website at www.drsmontgomery.com for other ideas and activities you can use with your students. Subscribe to my email list for more freebies and ideas!
I can help you make science come alive for your students with no prep, easy to use activities. Join our email list for a free activity you can use with your students today!